Showing posts with label Winter. Show all posts

Wednesday, November 23, 2016

No Tools Required! Make A Firewood Holder In Five Minutes


At last, I found an easy, inexpensive, tidy way to store a few days' worth of firewood, just in time for cold weather. And I didn't even need to use any tools to make it, because the lumberyard made the cuts for me.

Our wood burning stove is our primary heat source, and I love it! I'm warmer in winter in this house than I've ever been in any home we've lived in. An old-fashioned box-type stove with no fans or windows or gadgets, needing no special kinds of fuel, it works perfectly to radiate warmth at an even temperature through our main living areas without drafts or cold/hot spots.

We store the cordwood we buy (or that my dad cuts for us) in the alley behind the fence, and I bring up enough for a few days at a time. This is where the problem has been - I've never found a good way to stack the wood I need near the carport door, to keep it off the ground, dry... and tidy.  The log holders sold in stores are either expensive, too small or else way too long for my space, or frankly, most look awfully flimsy.

Then I found this clever idea on Pinterest. Unlike so many of the elaborate projects on there, this looked like something I could actually make (LOL!).

I bought a couple of 8 foot long two by fours (they are actually about 1 1/2" by 3 1/2" because the mill measures before they are planed smooth), and two concrete cinder blocks. The ones I used are about 8"x8"x15".  Two by fours are stronger than one by fours, so they are best for this project.

The nice folks at Home Depot cut the lumber in half for me, so it fit into my Jeep Cherokee easily.

Stand the cinder block on their sides with the holes up, right against each other. They need to be touching in order to keep them stable. You'll need about 48" clearance width at the top.

Drop one four foot 2x4 into each hole and lean it out.  That's it!  Less than 5 minutes, not counting shopping time.  Total cost for everything - $13 and change.

I loaded several sizes of logs into it. You could also make two of them, and have one for large logs and one for smaller pieces and kindling.

Another new thing this year is twig bundles (see them on top?), which I made to see if they are more effective/efficient than just breaking small dead-falls as needed. With 3 full-grown pecan trees and one bur oak in our yard, we have a LOT of small limbs to dispose of over the course of a year. I just wrapped them up with twine. I've used them for my first fire and it certainly was simpler "at the time". My hope is that the twig bundles will work well for those warm Texas winter days we don't need an all-day fire but just need to knock the chill off.  

This little project is already getting our colder season off to a good start.  Thank you for stopping by, and I hope you stay toasty warm this winter! :-)

Sunday, January 4, 2015

Canning Texas Ruby Red Grapefruit


This is the season when Texas citrus are ripe. It is surprisingly easy to can fresh grapefruit  (or oranges) - and it tastes so fresh when we open it in the summer, when the refreshing sweet flavor is welcome for breakfast on a bright summer morning! These videos show how I do it!

Friday, January 2, 2015

Frozen Water Pipes: How to Work in the Kitchen Without Running Water


My video on working while waiting for frozen pipes to thaw. :-) I hope this will be helpful to you in keeping "real life" going while conserving water in the kitchen when the water is off or the well is dry!  I am going to use these techniques while camping too! :-)

Wednesday, December 31, 2014

Picking and Cooking Wild Greens From Our Yard


How I gathered, prepared, and cooked Shepherd's Purse and Henbit to have as mixed greens for New Year's!   Shepherd's Purse is a member of the Mustard family, and Henbit is a member of the Mint family.  I was interested to learn from Wikipedia that Shepherd's Purse is a regular part of cuisines in Japan, Korea, and parts of China.  Both are winter annuals that are readily available this year on New Year's Eve in Texas, as they will tolerate freezing temperatures for a while.  I think they are VERY tasty!

Sunday, December 28, 2014

End of the Year Grocery Bargains To Look For After The Holidays


December and January are the best time of year to buy some things... check out the bargains I found, that are probably available in your stores too!

Friday, December 26, 2014

Home Remedies...It's Cold And Flu Season.


These are the home remedies I used while I was sick last week. They really work!


Thank you for watching. If you enjoy it, please click the "Thumbs up" button on You Tube, and please subscribe to my channel. No politics, just cooking, canning, stocking up, preparedness, foraging, nature lore, and How To! :-)  Maybe a little reenacting, cottage industry, and letterpress thrown in. :-)


Thanks so much and MERRY CHRISTMAS to all. May 2015 be a wonderful year full of happy adventures for all of us!

Tuesday, December 23, 2014

Why Waste Lump Charcoal?


Once in a while I put the ashes on the garden, but there is too much to do that with all of it, since our primary heat is from the wood stove. However, I never realized what good stuff I was throwing away! Here's how to save genuine hardwood charcoal from your fireplace ashes, that burns better, longer, hotter than glued-together briquettes! :-)


If you enjoy the video, please "Like" and subscribe on You Tube! There is a wonderful community over there and I am having a blast making new friends. Come visit! :-)

Saturday, December 20, 2014

Homemade Candy for Gifting: Martha Washington Candy Recipe!


YES there IS still time to make these for Christmas! They are unbelievable simple to make, and I share a little melting trick to make the chocolate coating easy to handle. The video also shows how I packaged them for giving.  Paul described these little gems as "Mounds on Steroids" LOL! Enjoy! And MERRY CHRISTMAS! :-)

Saturday, February 15, 2014

It's Time! Here's One Way To Start Tomato Seeds


My "determined to learn" project this year is How to Grow Tomatoes. I have not had any luck with tomatoes - poor yields (if any),  plants that turn up their toes too soon, deer harvesting them before I can.... but my neighbor raises loads of lovely red fruit so reliably he even sells them commercially, so I know it can be done.

I joined a Yahoo tomato-growing group and have been reading the archives and listening to advice. One important bit of advice is to listen to growers who are in a climate zone very similar to mine, because tomatos are finicky fruit. One reason there are lots of varieties is that there are lots of variables. The experts tell me that because of our hot, dry summers, we actually have a short growing season where tomatoes are concerned. Thus, they say to look for early varieties that ripen more quickly and heat-resistant cultivars.

One very helpful person advised that I should save my own seed from those that do succeed: he says that after a few years, I will have seed specifically adapted to my location and conditions - a land race version of the type.  That sounds pretty exciting. It means I need to select open pollinated types instead of hybrids, as hybrids do not generally reproduce true to form (not quite a mule, but not predictable either).

So, while I did choose a couple of hybrids, mostly I have heirlooms and varieties developed by Texas seedsmen that are proven to stand up well to our fast-rising heat. I will do another post on the varieties after they get going. I have bought from several sources (Baker Creek, Park, Burpee and Wilhite): a great source for Texas is Wilhite Seed, in Poolville. This old company has good seed for our crazy climates, including Porter tomatoes (Porter was a seedsman in Stephenville TX and his tomatoes are still legendary), their own specialty watermelons, and you cannot beat their prices - even very low shipping too.


Several people have mentioned they use a weak tea to soak or start their seeds, especially old seed.  This method was described by a man named Byron. They make the tea by taking a used teabag and steeping it for a few minutes in a teacup of boiling water, which they add to cool water to make a quart. "Weak tea" is a good word for it, as you can see above. I bet no one ever saw PG Tips as "blond" as that!

 I used the tea to lightly dampen the paper towels I am starting with.....


On advice of friends, as well as Tomatomania, I am using damp paper towels (you could use coffee filters) to start my seeds. Once they sprout (probably in just a few days), they can be transfered into medium by using tweezers to grasp them by the cotoledons (never the stem) and move them into the little sprouting pots.  I've always had a time getting seedlings past the first two leaves in soil, partly because they can take forever to germinate. The friend who told me first about this method said it is much faster than soil-based starting.


 So I lightly dampened a folded paper towel (these are those "half size" towels), laid out six individual seeds of one variety, folded the top over and placed it in a zip lock baggie labeled with the name of the variety.

I then added a bit more weak tea so that the whole towel is damp. I left the top of the baggie "ajar" without sealing it ---- not sure there, and I need to find out whether to seal them or not. 


 I laid all the baggies out on aluminum foil to reflect the light and heat, under a T8 florescent shop light with two daylight bulbs in it, about 4 inches above them. I think this part will need to be played with to get just right for the temps and conditiions here in my house.


 There is the shop light hanging, with a shade made of heavy duty tin foil draped over it to reflect the light and keep the heat in.  The shade is not needed today, but I will need to use it when the weather gets cold again - especially at night when I don't keep these rooms as warm.

Yes, I did put this little grow station right smack on the bar between the kitchen and living room. It is close to the wood stove, and that space is not required right now for anything else. Our sunny, South-facing laundry room would be the perfect place for seedlings, but I don't keep it heated so it would be too cold if it gets down in the 30s or below. I'll move the established seedlings back there as part of their hardening off process later on.

I surely hope this works! It would be so nice to not have to go buy plants! :-)

UPDATE 2/23/14: Part two is up - click here to read the next steps! :-)

UPDATE 3/11/14: Part three is here - click to read! :-) 


Saturday, January 11, 2014

January Update on My Winter Garden: Things Learned So Far


 I had a lot of fun planting my first "winter garden" this year. Then, Paul got sick. But God was so good that He watered my garden for me with nice regular rains for two months!  As a result, much of what I planted came up. I was able to harvest radishes and several messes of turnip greens!   With turnips, plant them thickly, then when you thin them, just snip the roots off and they are lovely tender turnip greens. All those little weeds you see around the turnips in the picture are just winter annual things like chickweed and henbit - they are edible too, if you want to fiddle with them.

I just scattered all my seeds down the rows in rather wide swaths.  But I learned that I can't cultivate the rows if I don't plant the seeds precisely. So come Spring, I'll use a seeder and put them down One At A Time. Then I can wheel the cultivator through the rows and take care of most weeds while they are tiny.


 I also learned that most things will not live through the winter, so I better limit plantings to those things I can harvest before the arctic air comes in and it gets down to 12 degrees!  Turnip greens I harvested. Turnips? Not so much. Unless they are still alive under their poor bedraggled and dehydrated dead tops - will report back on that in a couple of months!


 I used scallop shells I collected when we lived on the coast for row markers. Just punched a hole in them with a nail, wrote on them with a Sharpie, and wired them to a stick.  They look cute. People can't tell what they are from the street so they ask me about them LOL


Another almost-miracle was when I came home from the hospital and discovered my Saffron Crocus blooming! I planted those bulbs about 5 years ago, and they have never bloomed, not once. This year, three of them popped up their pretty little heads. Naturally, I quickly took my tweezers and collected the stamens. So now I have home-grown Saffron, nine whole threads of it! :-)


The deer always travel through my garden spot, even though we live in town. So I had planned to put up a barrier of plastic Deer Netting to keep them out.  But these are not deer tracks.  It is a tiny town, and most people let their dogs run around so we know most of the neighborhood pets. I thought at first there must be a new dog because there aren't any that large that come through. But then my neighbor looked at the tracks and told me it was a BOBCAT! The way to tell the difference in that cat tracks never have toenails showing, while dog (or coyote or wolf)  footprints always show toenails, since they cannot retract their claws like cats do.  That is one big bobcat!  They are common in this vicinity, but I never dreamed of them following the deer down Main Street!


My son Nick and grandson came a day early for Thanksgiving, and set T Posts around the perimeter of the garden. My grandson is 14, and is just beginning to get his muscles. He is going to have the same powerful arms that his dad and his uncles Nick and Ethan have. He made short work of pounding the posts into the ground. It made me proud to watch them work together so comfortably.

 The posts are spaced far enough apart that Daddy's tractor will still be able to fit between them. When spring comes, I'll attach the black plastic netting to them before the deer get used to finding tasty morsels inside. This is a very inexpensive solve. We can't afford to fence the whole area permanently, and these are nearly invisible from the street until we wrap them. The plastic netting can be replaced annually. And, if we want to enclose more area, these T posts are easy to remove. Well, they are if you are Nick. It was great fun watching him one-handedly pull up some that had been staking trees - posts I had not even been able to budge with all my weight behind it!

Onion plants are in at the local produce market, so I will buy them next time I am in town, and will go ahead and put them out in a portion of the garden I left for them. I LOVE growing onions. They are so rewarding, since we cook with onions every day: it feels good to raise somethng that is a real "staple" for the table.  We plant the little skinny plants, not the hard bulbs, and this far South we MUST have "Short Day Onions", because we do not get the length of daylight hours they have up North. Onions are very dependent on hours of daylight to make their bulbs. If we plant the regular onions listed in most seed catalogs, they might make good green scallions, but would never make bulbs.

Our winter is moving along pretty much as the Almanac predicted: cold and wet. So other than the onions, I probably won't put anything else out until March. Then I will plant more turnips, mustard, lettuces, etc. The seed catalogues are coming in and I'm having such fun reading them and plotting what to buy.  Right now is the pleasant winter day-dreaming time in the garden and I am enjoying every moment of it!

Saturday, September 7, 2013

Plowing For a Winter Garden, and Getting Ready Now for Spring Planting


 We are going to raise a garden again. The deer and grasshoppers ate everything I planted this year, but we are going to fence out the deer and the Farmer's Almanac says it is going to be a cold, wet winter - so goodbye grasshoppers (please Lord?)!

Daddy came this past weekend and plowed the garden spot for us. I was impressed with his tractor skill - he can line that tractor up on a dime. He met right up with the stakes I had put out to define the space.  He said "after it rains, whenever that is, I'll come back and plow it again and that will kill a lot of the grass and weeds". And look, we had lovely rain the same weekend - just like washing the car except a GOOD rain-bringer. So I said "Thank you for the rain" to both my heavenly and earthly fathers! You can see in the pictures the difference in the color of the dirt while he was plowing, and after the rain!


 We have decided to use plastic mesh as fencing. Our primary goal is to keep the deer out and this product has really good reviews for such an inexpensive solution. It provides a visible barrier to animals and directs them to find another way to go. Eventually, the deer should forget there is food here. We can use steel u-channel posts that will stay permanently in the ground, and simply replace the plastic every few years.

This space was kept in production for many years by the folks who owned it during the 70s, 80s and 90s. The soil, we hear, is fertile. It has a good loamy feel to it. The big rocks in it are nodules of flint, which the Comanche and other tribes used to make their arrowheads out of. I need to do some research, because there is a great lot of this that I think would surely have been removed over time, unless new nodules keep working themselves to the surface. You can see several of them in the photo below


In Texas, we can grow things all year round. I will plant turnips, beets, chard, onions, garlic, and collards for winter growing. The freezes won't hurt them and the extra moisture will be a boon. Swiss Chard, Collards, Onions and Garlic will keep growing year round - they behave as either perennials or biennials.  Turnips are wonderful - use them like potatoes in stews or serve mashed and creamed. Turnip seed is cheap, and these root crops are easy to grow. They are good practice for amateurs.

Then, come February, I can start planting for early spring: peas, greens & lettuce, onion plants.  We must use "short day" onions here because whether onions make bulbs depends on the number of daylight hours they are exposed to. That is why those record sized veggies come from Alaska, the 24 hour days keep plants growing without stopping to "sleep" at night. In the South, our days are shorter. The longer growing season gives us a longer harvest and perhaps more production but does not give us larger individual produce.

Miss Fuzzy Slippers, of the blog Fuzzy Logic (linked from my sidebar), has a great article about the importance of learning to garden before we need to feed ourselves. For most of us, this is indeed a learned skill, not an innate talent, and we need to begin practicing now to accumulate the wisdom necessary for good harvests in our particular space.  Be sure to read the comments too, there are lots of practical tips in them.

Are you gardening this year? If you don't have a space in your yard, see if your town has a Community Garden. The nearest large town to us has very reasonable fees ($35 for the year) that include water and compost. It is a great deal, especially when you consider that using a community garden plot, like the British "allotments", also gives you direct contact with experienced gardeners who can help and advise you as you learn.  Contact them now just in case they have a waiting list.

Gardening is good for the body and the soul. There is just nothing quite like knowing you are working with God and His creation to make your own food, just like human beings have done since the very beginning.

Happy harvesting and good eating await!


Saturday, December 24, 2011

Fear Not! For Unto You is Born in Bethlehem A Savior, Which is Christ the Lord


Luke 2:10-20 (KJV)

"And the angel said unto them, Fear not: for, behold, I bring you good tidings of great joy, which shall be to all people.  For unto you is born this day in the city of David a Saviour, which is Christ the Lord. And this shall be a sign unto you; Ye shall find the babe wrapped in swaddling clothes, lying in a manger.

And suddenly there was with the angel a multitude of the heavenly host praising God, and saying,
Glory to God in the highest, and on earth peace, good will toward men.

And it came to pass, as the angels were gone away from them into heaven, the shepherds said one to another, Let us now go even unto Bethlehem, and see this thing which is come to pass, which the Lord hath made known unto us.

And they came with haste, and found Mary, and Joseph, and the babe lying in a manger.

And when they had seen it, they made known abroad the saying which was told them concerning this child. And all they that heard it wondered at those things which were told them by the shepherds.

But Mary kept all these things, and pondered them in her heart.

And the shepherds returned, glorifying and praising God for all the things that they had heard and seen, as it was told unto them.
"

Thursday, October 20, 2011

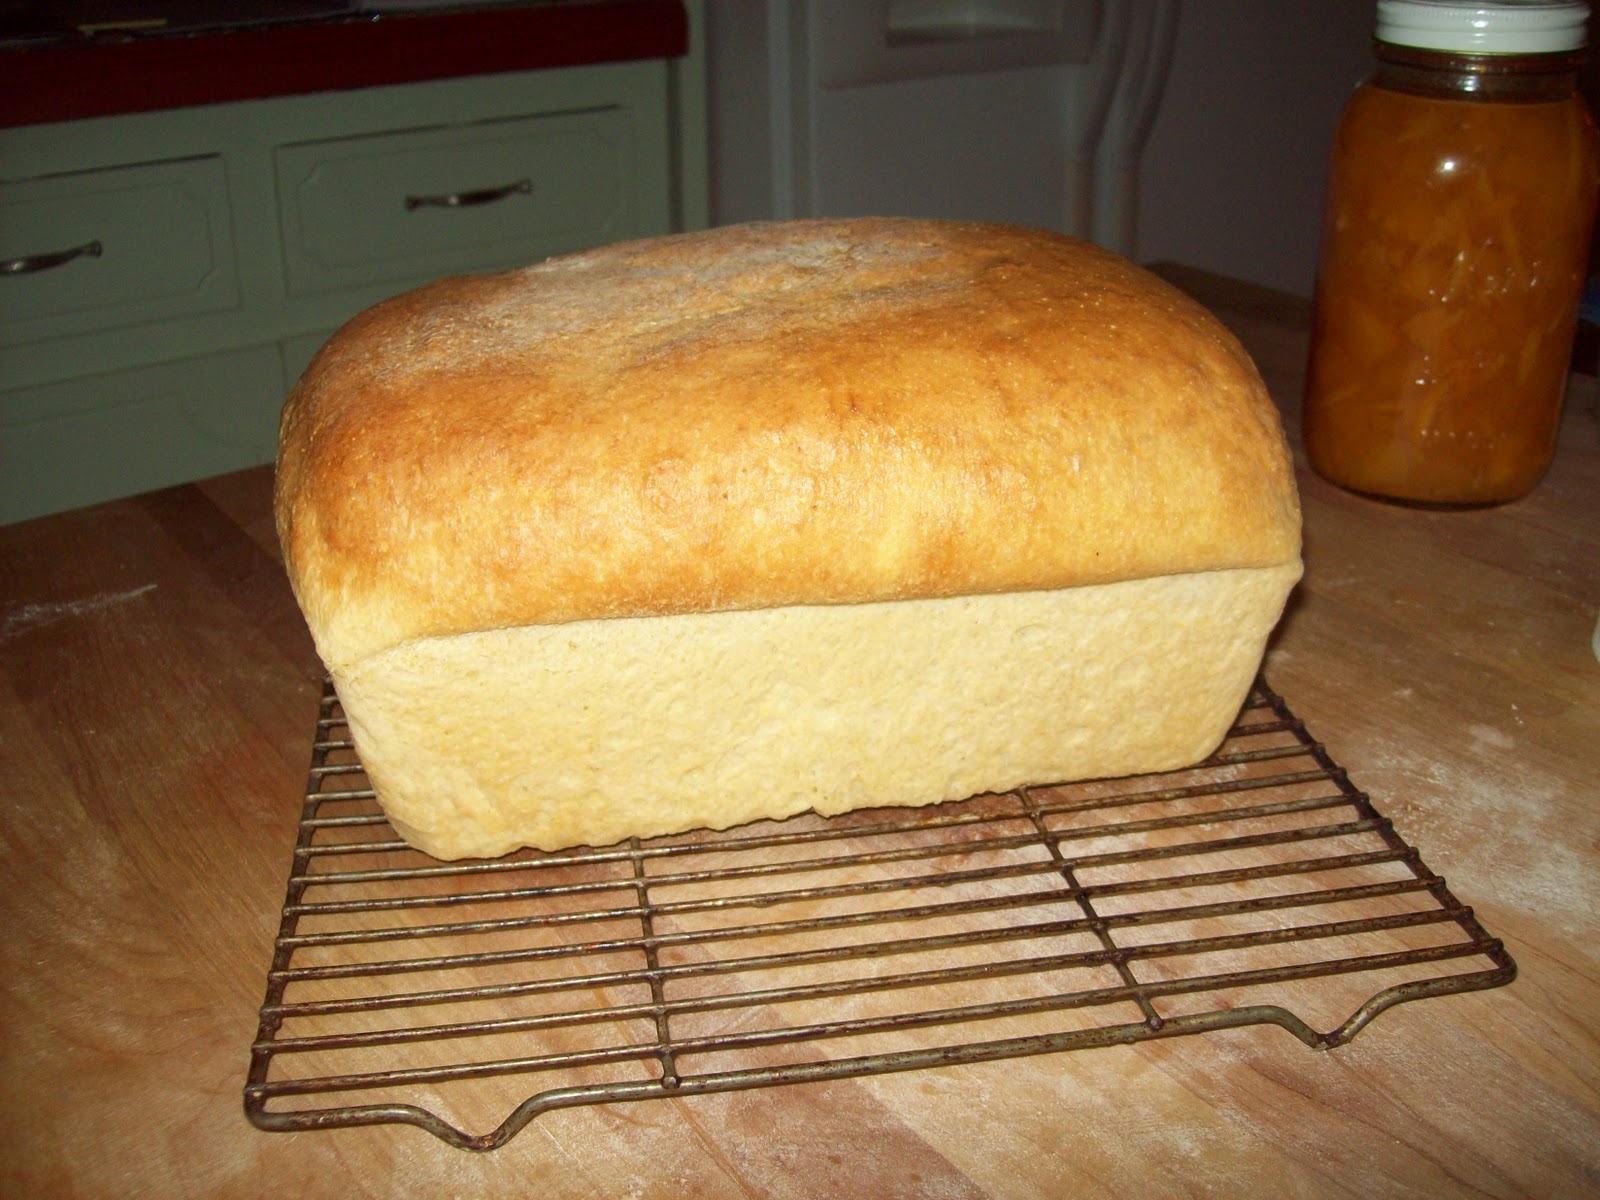
Learning How to Make Real Yeast Bread From Scratch - in Two Hours!


Last winter, I tried, unsuccessfully, to make homemade yeast rolls. I say "unsuccessfully" because they turned out exactly like cheap brown-n-serve rolls, except they took me all day (and 3 risings) to make.

Last weekend, I decided to keep trying until something worked. My recipe uses a method my grandmother learned in a breadmaking class 30 years ago. I chose it to start with because it is FAST (from start to baked in about 2 hours), and because it makes only one loaf (so less waste from failed experiments).

My first loaf, following the recipe & directions sort-of, was a pitiful failure. It used whole wheat flour, which made it heavy and dull. And when the instructions said "makes 2 small or one large loaf", I thought standard loaf pans were "small". Wrong.  I crumbled it and dried it to put out this winter. Maybe the birds will eat it on snow days, if they get hungry enough.

So I immediately made another. This time, I tried one of the alternatives in the recipe and used plain white flour. But their idea of "enough flour" is not enough for my oven, I guess, because this loaf - although better than the first - was still too weak to reach the top of the loaf pan. More bird bread (although we did eat a few slices of this, and praised the flavor).

Paul made a couple of observations - one of which was to add more flour until the dough would have the strengh to stand up to the yeast - and I started again.

Success!!!! My husband went from amused skeptic to excited fan. He says that if I'll make a loaf of this every week, we will not need to buy bread any more. Right now, it is fun - only time will tell if it becomes a habit! But I did make another loaf, just as lovely & tasty, a few days ago, so it was not a fluke. :-)

Without buying in bulk, this bread costs about 94 cents per loaf to  make (including electricity for the oven). The two most expensive ingredients are yeast and flour. If I buy yeast by the pound, and flour by the 25 pound sack, we could probably reduce that by 35 cents. Baking in a gas oven (or in, say, Idaho, where electricity costs half what it does in Texas, thanks to Federal dam projects of yesteryear), would shave another 6 cents off, bringing cost per loaf down to 53 cents.


It is simple enough that I could make a loaf after work - which is what I wanted. I simply do not have enough free time to bake, otherwise.  Here's my final recipe:

One Fine Loaf

Before starting, turn oven light on, but DO NOT preheat oven. The heat from the light bulb will create a warm space for the dough to rise in.

1 1/2 Cups white flour
1/2 Cup cornmeal
1 teaspoon salt
1 "scant" Tablespoon active dry yeast (or one package)

Mix these together. Then add:

1 Tablespoon cooking oil
2 Tablespoons cane syrup or golden syrup
1 2/3 cup hot tap water (hot to touch from the faucet, ~120 degrees F)

Beat for 2 minutes with electric mixer on medium (I used Paul's Kitchenaid) or by hand - you could even use an egg beater at this stage).

Add: 1 1/2 Cups white flour

If dough is still too sticky to remove from the bowl add another 1/2 cup to 1 cup white flour. The total amount of flour may vary from day to day.

Beat with dough hooks in a Kitchenaid mixer at medium to med-high for 3 minutes. Or knead vigorously by hand (to knead by hand, turn out onto a floured surface, flour your hands and knead until smooth and elastic).

Cover with a towel and allow to rise for 20 minutes. I accidentally skipped this rise and my bread turned out fine, but it will be better with it.

Grease one loaf pan with shortening (rub the entire inside of the pan and the top edge with a light coating of hard shortening or lard).

Punch down dough, turn over, tuck edges under to put the pretty side up and drop into the loaf pan.

Set the loaf pan in the oven, close the door and leave the light on (but do not start the oven yet).

Allow to rise until top of loaf is above the top of the pan, about 1 hour.

Optional: When loaf has risen but before turning the oven on, carefully brush the top with an egg wash (mixture of raw egg and 2 tablespoons water). Don't use all the egg wash on it, just enough to dampen the top. This will give the crust a nice shine.

Put loaf in center of oven, close the door, and turn the oven on to 350 degrees Fairenheit. No preheating needed - this loaf benefits from the gradual increase in temp that occurs if it is in the oven while it is heating.

Bake for 35 minutes.

If you did not do an egg wash, brush the top crust with melted butter as soon as you take it out of the oven.

Immediately turn the pan over and remove loaf from pan. If you thump the bottom, it will sound hollow. Cool upside down on a wire rack for 5 minutes, then turn upright and let sit on rack until fully cool - or until you can't wait any longer!

If this loaf was not perfect, make another asap, and keep trying until you love the results.

While baking is a science, it's a homely one, and that means there's a bit of artistry to it as well. You can bake beautiful bread - just make it until you do!

Thursday, March 10, 2011

If You Love Paris


Erin Elizabeth, of the blog My Heart Belongs To Me (link from the sidebar as well), recently traveled to France with her sister Neile. Her posts overflow with memorable photos of Paris - can you smell the rain on the avenue, the clementines in the market, the flowers on the vendor's corner, the sugar from the treat shop window?

The "love locks" along the Seine made my heart melt. What a romantic little memento to leave along the way in a love story!

From mossy tombs to modern museums, from french fashion to fresh design, from morning of the day to the lively night, Erin's posts make for a lovely armchair afternoon in the city of light.

we’ll always have paris

paris. day 1.

paris. day 2.

paris. day 3.

paris. day 4.

paris. day 5.

paris. day 6.

Monday, December 20, 2010

Total Lunar Eclipse TONIGHT (Early Tuesday AM 12/21/10)

There's a total eclipse tonight (Thanks Mandy for reminding me!). The eclipse is caused by the shadow of Earth moving across the face of the Man in the Moon. Instead of hiding it, the moon will turn a beautiful amber red color and cast a fiery glow. For those of us in Central Time, it will start right after Midnight at 12:32 am, reach totality between 1:40 am and 2:53 am, and wrap up at 4:01 in the morning. So there's a long time available to see it. :-)

Check out the University of Texas' Stardate.org (Magazine of the McDonald Observatory) for more details. Thanks to Stardate for the photo shown here!

If you are reading from elsewhere in the world, NASA has a great graphic at this link that shows the range of visibility for this eclipse.

Coincidentally, it's also the winter solstice. There's a lot of great information about the moon and stars on the Farmers Almanac website (good for gardening and weather info too).

Monday, December 13, 2010

Look Up! Shooting Stars in the Western Sky in the Wee Hours


Nick called and reminded me tonight> Set the alarm for the Geminid Meteor Shower: the article says the shower will peak about 5 am Central time tomorrow morning (Tuesday December 14) with up to 100 shooting stars per hour.

If you are a night owl, best viewing will be after moon-set (midnight or after).

Thanks to University of Texas' Stardate Magazine for the photo and information. We visited the McDonald Observatory once and it was a wonderful trip. Located in the Davis Mountains, with nothing to do but wander through the beautiful countryside. Devin was not even two at the time and he talked about looking through the telescope for years after.

According to Peter Freuchen, the Eskimos of Greenland used iron from a meteorite to make knives with - they had no other access to metals before trade was established. A sharp edge is essential for life in any wild environment, and the Greenlanders depended, like all arctic peoples, on animals for survival. Permafrost prevented mining so the meteorite was literally as well as truly a gift from Heaven that improved their lives.

Tuesday, August 3, 2010

And How Cold Were The Winters?

Oh doesn't that snow look nice and cool right now? This is from February. We had so much snow this past winter - and so many cold days! It was one cold winter. We knew in advance that there would be snow, thanks to the Texas Winter site ( txwinter.com - linked on my sidebar)


Texas Winter is the hobby website of a Texan who enjoys meteorology and has a keen sense for prediction. It can be a real challenge to get reliable winter weather information for Texas. We have multiple climate zones and squillions of micro climates. The Farmer's Almanac does a good job generally, but it's too general to help us. So it is great to have someone who lives here really focus in.

Plus, it's intriguing to learn more about different kinds of scientific weather prediction. Because Texas Winter is the work of an individual enthusiast, it's even more fascinating to me.

Go check them out - all the posts are there from 2009/2010, and they've just announced they are going to predict the winter again this year!


~


* Title is from what are known as the "Quaker Questions", an exercise in exploring the development of faith:
Where did you live when you were a child, and who lived with you?
How cold were the winters, and how was your home heated?
Who was the warmest person in your life when you were a child?
When did you first know God as a warm Being, and how did this happen?

Friday, February 19, 2010

Dear So and So

Dear So and So

~~~~~~~~~~

Dear Winter,

I don't believe in anthropoginobldygoop global warming, but this year, Winter, you are making me wish I did.

Time to go, Winter, and let Spring come. Please.

We might long for you again in the sweltering Summer if you go on now.

Pretty please?

Signed: Hates The Cold

~~~~~~~~~

I found "Dear So and So" over at Mom In High Heels, always fun. To take part, check out Kat's blog at 3 Bedroom Bungalow - a new find. Thanks to both for fun blogs that let us share their adventures!

Saturday, January 30, 2010

A House with a Name

An unexpectedly free weekend... and it is too cold to do anything! 21 degrees out right now, my rain guage has a block of ice 8" tall in it, and my onion plants await their beds. Doesn't look like the onions will get planted this weekend unless tomorrow warms up considerably. So, I'll piddle around inside, make potato soup, and dream about Spring.

I an an Anglophile, and I have always wanted to live in a house that had a name. I love the British predeliction for retaining place names over grid numbers. I once got to visit London for work, and we stayed at a hotel with this address: "The Petersham, Nightingale Lane, Richmond, Surrey". My taxi driver from Heathrow airport literally picked his way there one landmark at a time. It was a fabulous hotel and visit and I will blog about it some day.


Our last house, everyone locally associated with the builder, who was well known and had lived in it for a year before we bought it. It never came to be "The Ours' house" - it was always "Oh - you mean the Theirs' house!" This house has been the same. We've been here two years and people still can't place it without the names of people who lived here before us. "Corner of..." Nope, can't place it. "Next door to..." Nope, doesn't ring a bell. "Across the street from...." Sorry, not familiar with it. Even "The house with the Texas Flag painted on the garage door" doesn't do the trick. But if we say "The Theirplace", the light of recognition immediately goes on in every eye.

I want a name for the house that isn't that of the former owners. So I have been thinking of names since we got here, and none seemed to fit.

But now I have just realized that in naming the blog (without much thought, really, since every name I thought out had been taken), I have effectively named my house! "Pecan Corner" is a fine name for a little cottage by the side of the road, don't you think?

Now I need a sign! :-)


* These photos of our house and garage were taken by Lani when she and Nick were here over Christmas weekend. Aren't they great?

Thursday, December 31, 2009

Happy (Old) New Year! A Naturalist's Vintage Calendar

Did you find a vintage calendar for the upcoming year? Here are the first pages from a beautiful weekly one of John Burroughs quotes. It was for the year 1926, and is accurate again for 2010.


The page for January 1 and 2 reads "The longer I live the more my mind dwells upon the beauty and the wonder of the world.", from "The Summit of the Years".

Week two, January 3 through 9, has this "A severe artist is Winter! No longer the canvas and the pigments, but the marble and the chisel." from "Winter Sunshine".


In a previous post, there's a list of the calendars that correspond to 2010, and a link to information on which of the 14 calendar grids are applicable to any particular year. Jot down years from your favorite eras and take the list shopping with you.

"What has been will be again,
what has been done will be done again;
there is nothing new under the sun."
Ecclesiastes 1:9 (New International Version)

Happy (Old) New Year!

LinkWithin

Related Posts with Thumbnails